Prerequisite
You must already have signed in to FP Sign 2.0. The following article explains how to do this:
⇒ Go to the article: Switching to FP Sign 2.0
Installing the FP Sign 2.0 DATEV Connector
Your IT team handles installation and setup:
- Download and install the FP Sign 2.0 DATEV Connector.
- If you use the Agent Service, also install the FP Sign 2.0 DATEV Connector Agent Service.
- Set up the connector. You can continue using the registry settings from the FP Sign DATEV Connector. The configuration file (settings.json) is carried over automatically when you install version 2.0.
⇒ Download: FP Sign 2.0 DATEV Connector
⇒ Download: FP Sign 2.0 DATEV Connector Agent Service
⇒ Download: Installation guide for switching to the FP Sign 2.0 DATEV Connector
Using FP Sign 2.0 in DATEV
Once setup is complete, you can use the new connector directly from DATEV.
Right-click a document in DATEV to access the options “Sign via FP Sign 2.0” and “Request a signature via FP Sign 2.0”. Selecting either option opens the new interface, where you can process documents according to your settings.
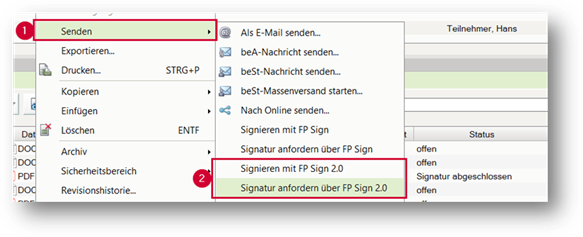
Figure: DATEV context menu (Send > FP Sign 2.0)
Installation paths (for your IT team)
| Installation | C:\Program Files\FP DBS\FP Sign 2.0 DATEV Connector |
| Agent Service | C:\Program Files\FP DBS\FP Sign 2.0 Datev Connector Agent Service |
| Registry | HKEY_LOCAL_MACHINE\SOFTWARE\FP DBS\FP Sign 2.0 DATEV Connector |
| Logs and settings | %AppData%\FP DBS\FP Sign 2.0 Datev Connector |
| Cache | %LocalAppData%\FP DBS\FP Sign 2.0 Datev Connector |
Do you need help?
Contact your company’s administrator or send a request to our support team using “Submit a ticket”.
Was this article helpful?
That’s Great!
Thank you for your feedback
Sorry! We couldn't be helpful
Thank you for your feedback
Feedback sent
We appreciate your effort and will try to fix the article